301 Redirects Integrated

Step one is going to be crawling the old site in Screaming Frog. You are going to want to crawl all of the pages. So if it’s a big site like Transline or another big ecommerce site, it might take a while and you might need to use a separate PC. Your real goal here is to capture all of the URLs on the site.
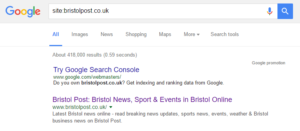
Secondly, use the search operator “Site:” and then the domain name. Inside of there, punch it in the Google search results. This will give you all of the pages that Google has indexed. From there, you will scrape the URLs and then export them into the same file as you have the Screaming Frog export and remove the duplicate URLs. These two processes should give you a list of all the URLs on the site and that Google has indexed.
Next steps
You are going to need to see the new site and it is going to need to have all of the new pages built out. It is fine if all the content isn’t there yet but we need to at least have the structure in place.
From there, we are going to open up our list of old URLs, and then we’re going to do a one-to-one match of all of the old URLs in one column, to the corresponding new URL in the other column.
After we have this in place, we are going to start setting up what are called 301 redirects. Before we start doing this, we need to talk to Daniel and the development team about how these redirects are going to be installed and on what hosting service we are going to be using. This is because the format and syntax will be slightly different depending on each host.
Finally, once the site is live, Daniel and the development team will go in and install the 301 redirects on the old domain. After that, the SEO team needs to go through and test each URL using Screaming Frog to verify that each URL is redirecting to the new URL and no 404 or redirect errors exist.
Development steps
The first and most important thing we will do is go inside of the my.wpengine.com control panel. The username and password to log in to WP Engine can be found inside of 1Password.
This is where our hosting login ultimately is. The strength of WP Engine is it allows us to run speed tests inside of here. This is a feature that an Amazon AWS or dedicated type hosting won’t allow you to do.
Since WP Engine is a dedicated WordPress hosting environment, we get to enjoy some nice perks. The main perk we got is inserting 301 redirects. Once you get inside of the WP Engine control panel area, you would select the website that you’re working on.
Just for example, we are now going to work on www.GlobeRunner.com. This is typically the grunner2 install. On the left hand side bar, we will see:
- Overview
- Domains
- CDN
- Redirect rule (Hint: We are going to use this in the tutorial)
- So on and so forth
For now, go ahead and click “Redirect rules”. You’ll see a bunch of options inside of here. You will also see all of the existing redirects that are already in place.
At one point, the old website (or a deleted page on the website) might not exist anymore. If somebody on the internet tries to go to that page, they will receive what is called a 404 not found page or it will simply say “Page is not found”.
What we will do for pages that we feel have SEO juice behind them is we will redirect that page to either where that content has moved or we’ll just move that to the home page that way we don’t entirely lose all of the SEO juice. But at least we compensate something.
This is where we get into the weeds about what we should redirect versus what we should not redirect. I would lean on the expertise of your SEO team here.
Final steps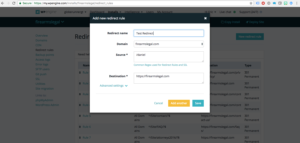
Once we are on the redirect rules page, you can see all of the existing redirects. You can edit them inside of here. It’s relatively easy to do so. But, to show you in tutorial form, click on “New redirect rule”. That button is in the far upper right hand corner.
A little mono window is going to pop up asking you to give it a redirect name. Most people will call it “Redirect Rule 35”. The name is arbitrary.
Then it will ask you what domain you’d like this redirect to reside on. 9 times out of 10 there’s only going to be one option. For example, Muenster Milling only has one. Firearms only has one. However, Transline has 3 or 4 different URLs in there.
Basically, pick the primary URL that the client uses, in this case, Firearms Legal, and now it’s going to ask you for a source. This is going to be the permalink that you need to redirect.
What is a permalink? If you’re on firearmslegal.com/Daniel, and it 404s, Daniel is the piece known as the permalink. So when we are looking at source, you would type in the permalink. In this case, it would be /Daniel. The destination would be wherever you want it to go. For example, firearmslegal.com/Daniel probably doesn’t need this page to exist at all.
Since it does not need to exist, we can just redirect the user to the home page here. Once we have all of the information typed into the redirect rule, you can click “Save” and we can keep moving on until we are done.